

The Next Step
The Next Step is a place for you to review exercises that your Podiatrist has given you. It is also a place for our Podiatrist to share information about how to better care for your feet and some of the wonderful experiences that we get to be part of. We will talk about different foot problems and how we can help you not to have sore feet. Being a Podiatrist is an ever-changing job with new challenges around each corner. We will share some of our wins, challenges and beautiful people we get to meet and care for.

Calf Stretches
How Stretch your calf muscles correctly
Stretching your calf muscles is essential for maintaining flexibility and preventing injuries, especially if you're engaged in activities like running or walking. This guide will show you how to stretch both the gastrocnemius and soleus muscles, focusing on proper foot placement and alignment for an effective stretch.

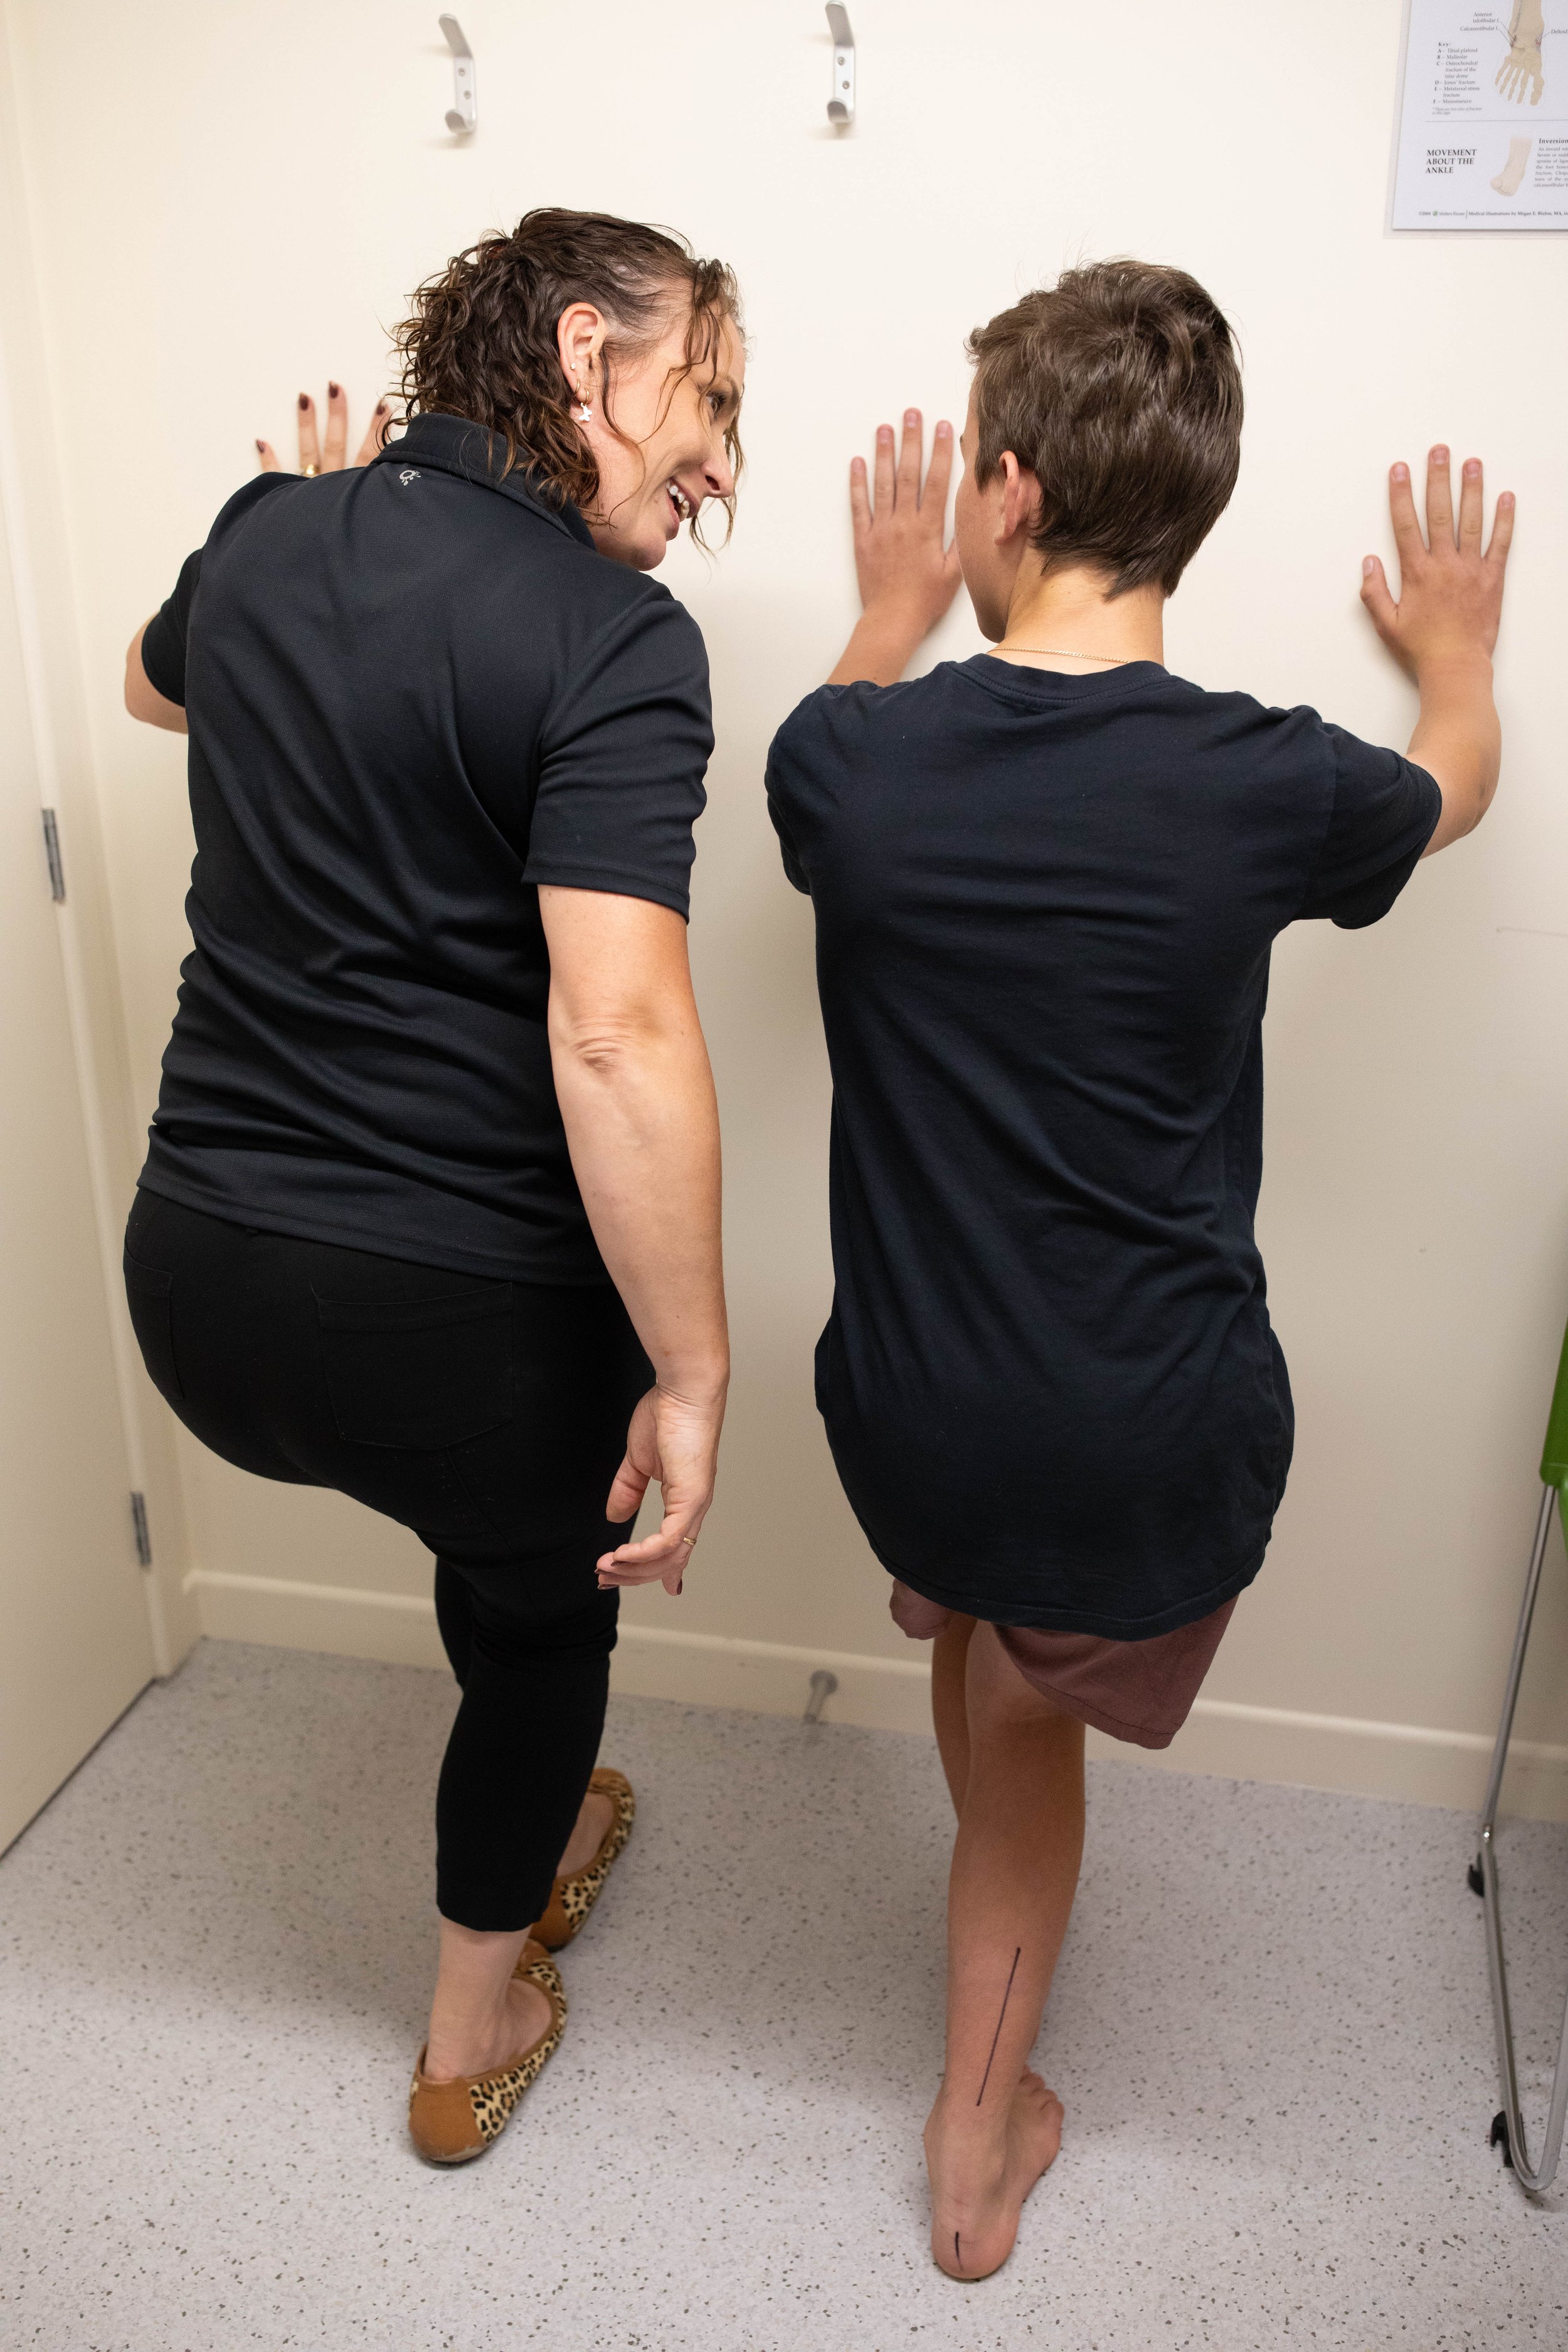
Gastrocnemius Stretch
1. Stand facing a wall with your hands placed against it at shoulder height for support.
2. Take a step back with your right foot, keeping it straight and your toes pointing forward at 12 o'clock.
3. Bend your left knee forward, keeping your heel flat on the ground.
4. Shift your weight forward onto your left leg, feeling a stretch in the back of your right calf.
5. Ensure your arch is lifted, with even pressure on your first and fifth toes.
6. Hold the stretch for 20-30 seconds, then switch sides and repeat with your left leg.

Make it stand out
Soleus Stretch
1. Remain in the same position facing the wall.
2. Bend both knees slightly and step back with your right foot, keeping it straight and your toes pointing forward.
3. Shift your weight back onto your right leg, bending your right knee slightly and keeping your right heel on the ground.
4. Lean forward slightly, feeling a deeper stretch in the lower part of your calf.
5. Maintain an elevated arch with even pressure on your first and fifth toes.
6. Hold the stretch for 20-30 seconds, then switch sides and repeat with your left leg.
Tips:
- Keep your upper body relaxed and upright during both stretches.
- Avoid bouncing or jerking movements; instead, stretch gradually and gently.
- Focus on breathing deeply and relaxing into the stretch for maximum effectiveness.
- Perform these stretches regularly, especially after workouts or periods of prolonged sitting, to maintain calf flexibility and prevent tightness.
- Adding this activity to your normal daily activities will help
*Brushing your teeth *Waiting for the jug to boil *Doing the dishes
Stretching your calf muscles regularly is crucial for maintaining flexibility and preventing injuries. By following these steps and focusing on proper foot placement and alignment, you can effectively stretch both the gastrocnemius and soleus muscles. Incorporate these stretches into your routine to keep your calves flexible and healthy.

How to Squat Correctly
Knowing how to squat correctly is not only good for your back, but for your knees and feet too.
Squats are a fundamental lower body exercise that can be done at home with ease. This guide outlines the correct technique for performing squats effectively, with the option to use a resistance band for added challenge.
Knowing how to squat correctly helps strengthen you legs, keeps your knees and arches working in the correct alignment and puts your pack in the correct position decreasing the chance of injury.
1: Proper Stance - Stand with feet shoulder-width apart, toes slightly turned out. Maintain even weight distribution across both feet, and lift your chest up for proper posture.
2: Engage Your Core - Brace your core by pulling your belly button towards your spine, ensuring stability throughout the movement. Relax your shoulders
3: Lowering Phase - Initiate the squat by bending your knees and pushing your hips back, as if sitting down on a chair. Keep your chest big and upright throughout the movement. This should take 3 seconds.
4: Depth - Lower yourself until your thighs are parallel to the floor or slightly below, ensuring a full range of motion while maintaining proper form.
5: Knee Position - Ensure your knees track over your toes, preventing them from extending past or collapsing inward.
6: Ascending Phase - Drive through your heels and midfoot to return to the starting position, extending your hips and knees simultaneously. Keep your chest lifted throughout. This should take 3 seconds.
7: Optional - Resistance Band Setup - If desired, place a resistance band just above your knees for added resistance during the squat. Maintain tension on the band throughout the movement.
8: Sets and Repetitions - Complete 3 sets of 10 repetitions, focusing on squatting low with a big chest. If using a resistance band, ensure it challenges you without compromising your form. Rest for 60-90 seconds between sets.
Performing squats correctly at home can significantly strengthen your lower body muscles. By following these steps and maintaining proper form, you'll maximize the effectiveness of your workout. If you opt to use a resistance band, ensure it complements your squatting technique. If you have any concerns, get in touch with us for more help.

Ankle Injuries
Ankle injuries
Ankle injuries are a real pain - literally!
Here are a few things that Jessica Dobbs Podiatry can do to help
Ankle injuries are really common and a huge pain - Literally! Podiatrists are experts in the foot and ankle and at Jessica Dobbs Podiatry we can help you with a recover plan for your injured ankle.
So what is an ankle injury?
An ankle injury or sprain happens when the supporting ligaments in the ankle get stretched, damaged and torn when the ankle is twisted suddenly outside of its normal range of movement, normally from an active injury. Most ankle sprains (85%) affect the ligaments on the outside of the ankle.
An ankle sprain will have:
A lot of swelling, bruising and pain. It can be hard to walk on a sprained ankle and sore to touch. is an acute injury that causes swelling, bruising, pain and tenderness
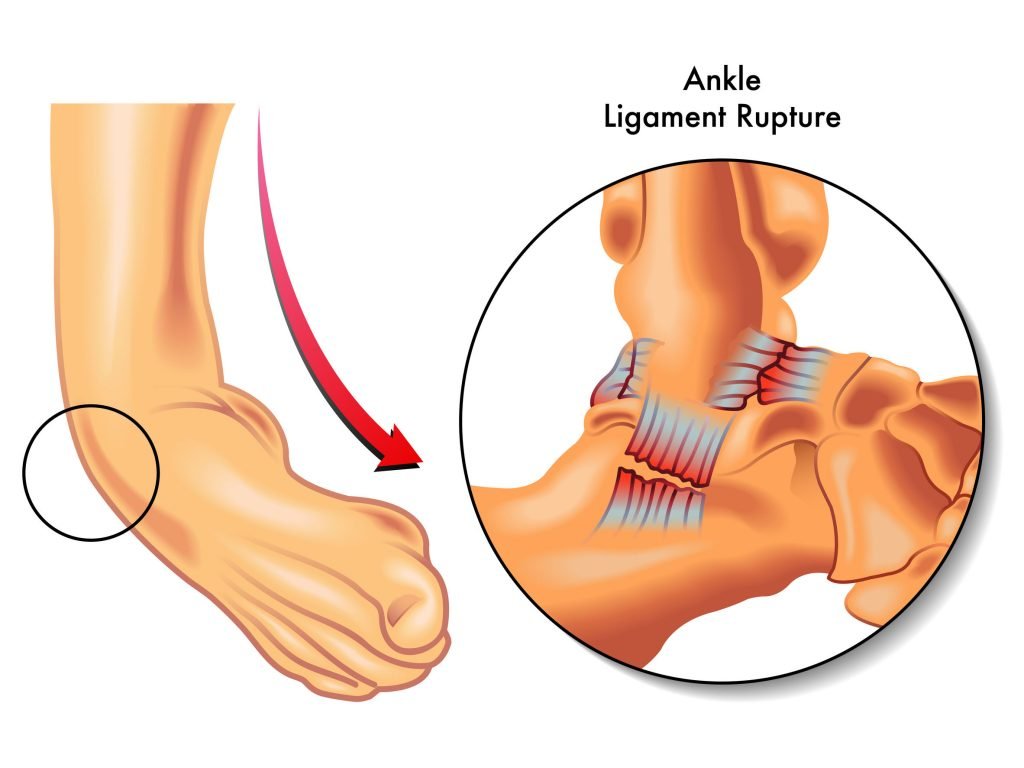
Ankle sprain and associated ligament for a Lateral Ankle Sprain
What do I do if I sprain my ankle?
In the early/acute stages of an ankle sprain injury, it is important to consider the following:
Rest, ice, compression and elevation (R.I.C.E) for 48 hours
Reduce or modify activity levels to help speed up recovery
See your podiatrist, physio or doctor to assess the injury. We might send you for X-rays if we assess that there could be a fracture in the ankle.
Register your injury with ACC
How can a podiatrist help?
Podiatrists are foot specialists - we are experts at helping to fix your foot problems. When you come to see us at Jessica Dobbs Podiatry, we will gently assess your injury, do a few tests to determine the extent of your injury, and log your injury with ACC. This will involve moving the foot and ankle, finding out where it is sore and sometimes sending you off for more assessments like an x-ray to rule out any breaks.
What are my treatment options:
Strapping or ankle braces to provide you more support short term.
Orthotics and footwear advice to help provide support for your foot and prevent further injury.
Stretching and strengthening programmes to support and strengthen the joint. We will compile a recovery programme for your injury.
Recovery: What can you expect following treatment?
Recovery is different for every individual. It can take to recover from an ankle sprain, especially if you sprained your ankle really well!